Shooting in manual mode is nothing mystical or for which you should be afraid, especially if you are not under pressure and you have time to meditate on your settings. Learning these simple technical knowledge will give you the photography fundaments, necessary to be confident with your camera and to taking control of the action.
In the begin of this article, I prepared for you a “Photography Cheat Sheet” with a graphical representation of what I am gonna tell you. You are free to print it and consult whenever you are struggling with exposing in camera.
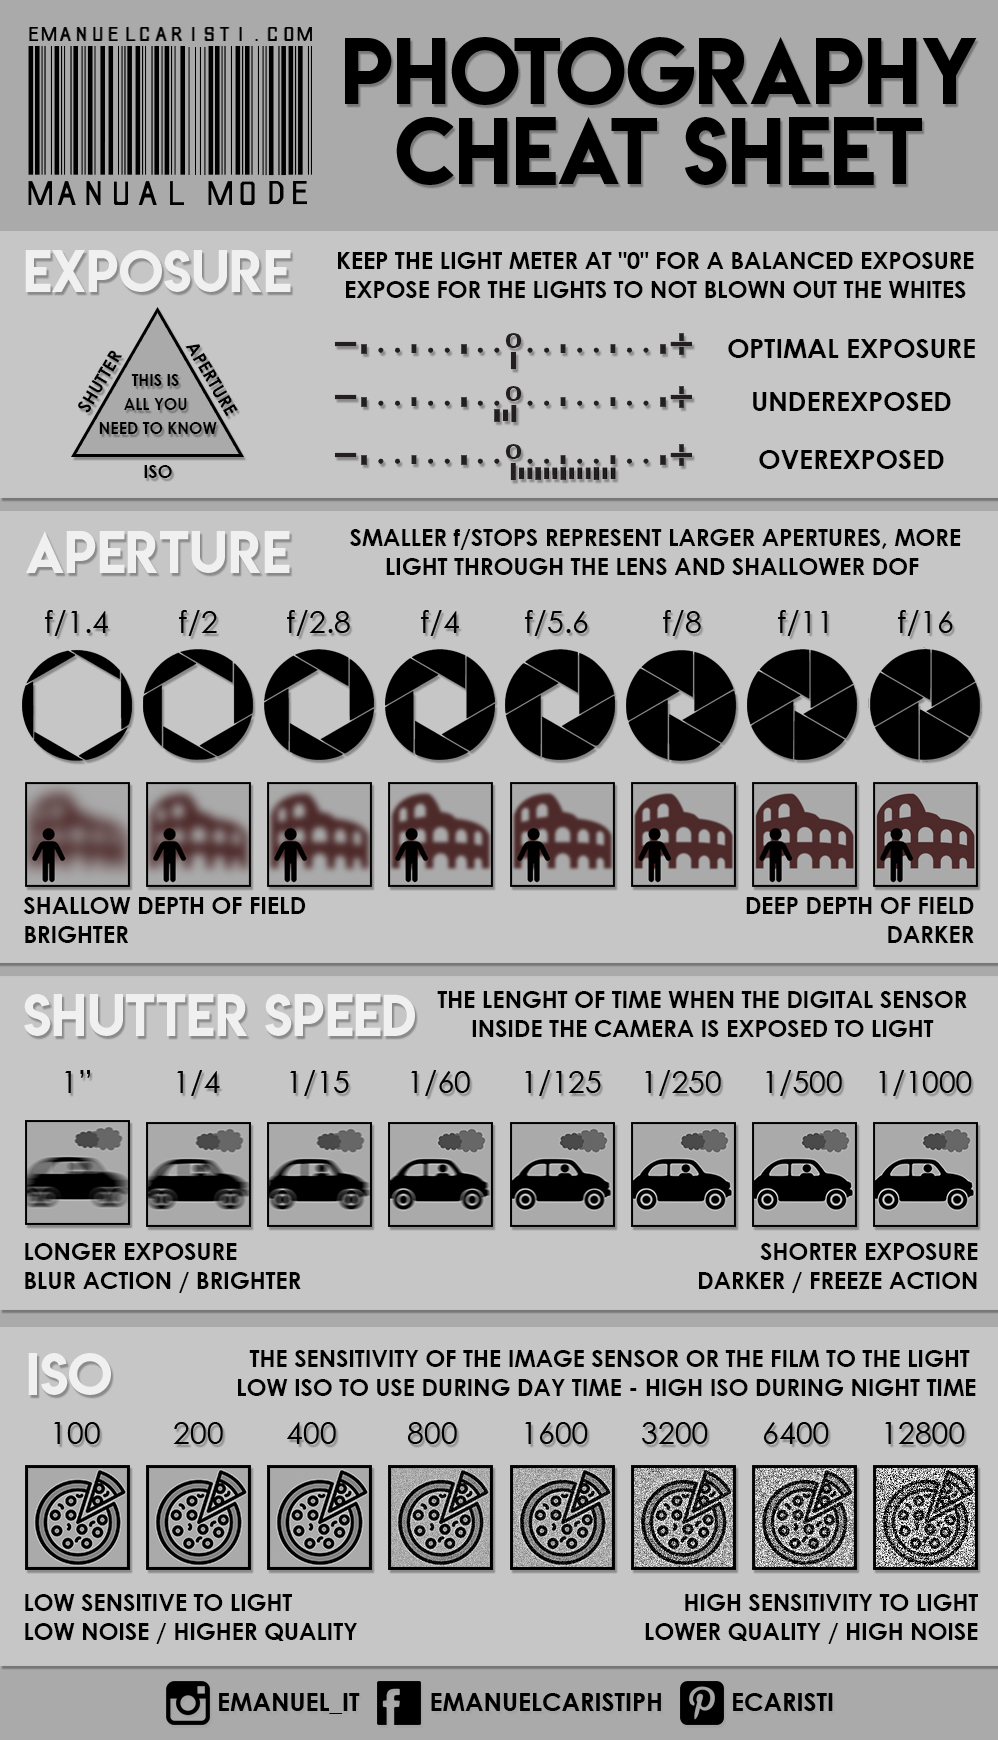
If the visual guide is already enough explanatory for you, jump to the 20 Beginner Photography Mistakes!
All you need to know to start to take well-exposed pictures is how Aperture, Shutter speed, and ISO affect your photos.
I really simplified certain concepts to make them easier to digest, my wish is you get the basic tools to be more active taking photos. If you have not a DSLR or Mirrorless, you can certainly use your smartphone, its camera surely can be used in manual mode.
EXPOSURE
“The exposure is the amount of light per unit area which reach the image sensor or film”. A “Correct” exposure may be defined as the exposure intended to be achieved by the photographer, but generally, a well-exposed photo is when the highlights and shadows are balanced in order to reach a pleasant result.
An important tool to make things easier, without appealing to quantum calculations, is the in-camera light meter. It gives you a visual indication of the final photo exposure in according with the camera IA.
Try to keep the light meter at “0” for a balanced exposure and remember to not trust it blindfold, since the camera prevision could be wrongly influenced by the presence of a lot of white (or highlights) and black (or shadows).
Double check the back screen LCD or the histogram time to time in order to be able to correct the mistakes on the way.
APERTURE
“The aperture is the hole which trough light travels” and the size of it is indicated in f/stops. Smaller f/stops represent larger apertures, more light passing through the lens (brighter) and shallower Depth Of Field (less in focus = more blurry), higher f/stops vice versa, less light hitting the sensor (darker) and deeper Depth Of Field (more in focus = less blurry).
SHUTTER SPEED
“The shutter speed or exposure time is the length of time when the digital sensor inside the camera is exposed to light”. Generally, the shutter speed in most of the recent cameras goes from Bulb (the photographer decide when start and finish the exposure) to 1/8000 s (usually the fastest speed).
As you can imagine a faster shutter speed will help you freeze the action, but it will short the time of exposure of the sensor to the light (darker), in the same way a slower shutter speed will let the camera to collect more light (brighter) and to impress, for a longer time, what is going on in front of the lens in the final photo (if the subject is not static, motion blur could be generated).
ISO
“The ISO is the sensitivity of the image sensor or film to the light”. Basically, if you wish to take a photo with more details and less noise as possible you should set the “native ISO” of your image sensor, usually the lowest available (in my Nikon D750 is 100).
If the conditions require more light, or you need to play with other settings to achieve a certain result (freeze the action, deeper depth of field….), you have the chance to raise the ISO. Increasing the sensitiveness to the light you will bring more light to the photo as well more grain and a consequent loss of details.
You can achieve the same exposure using different combinations of settings, the important is to play with them without being afraid. Enjoy every single moment of the act of taking photos, experiment and discover your style!